
A separate vapor barrier isn’t automatically the answer to a damp or drafty rim joist. The priority is a continuous air barrier, and closed-cell spray foam can create one by connecting the foundation wall, rim joist, and floor sheathing. Properly installed, spray foam rim joist insulation can also help limit the air movement that carries moisture into this vulnerable part of the home.
It makes sense to consider vapor control: rim joists sit where the foundation meets the wood framing, and gaps here can affect comfort and moisture conditions. Sealing those gaps can help reduce the chance of condensation and mold. Protecting indoor air quality also matters for everyone in the home, especially people sensitive to airborne irritants.
This guide explains how closed-cell foam insulates and seals rim joists, what to consider before application, and how moisture management and ventilation fit into the bigger picture. You’ll also learn when a continuous foam air seal is the practical solution and why the details around it matter.
Key Takeaways
- Create a continuous air barrier by connecting the foundation wall, rim joist, and floor sheathing.
- Use spray foam to fill suitable gaps; the U.S. Environmental Protection Agency guide recommends it for gaps from 1/4 inch to about 3 inches.
- Choose foam thickness according to the rim joist’s required R-value and your home’s climate zone.
- Pair air sealing with thoughtful moisture management and ventilation to support healthier indoor air and help limit mold risks.
Air sealing and indoor air quality
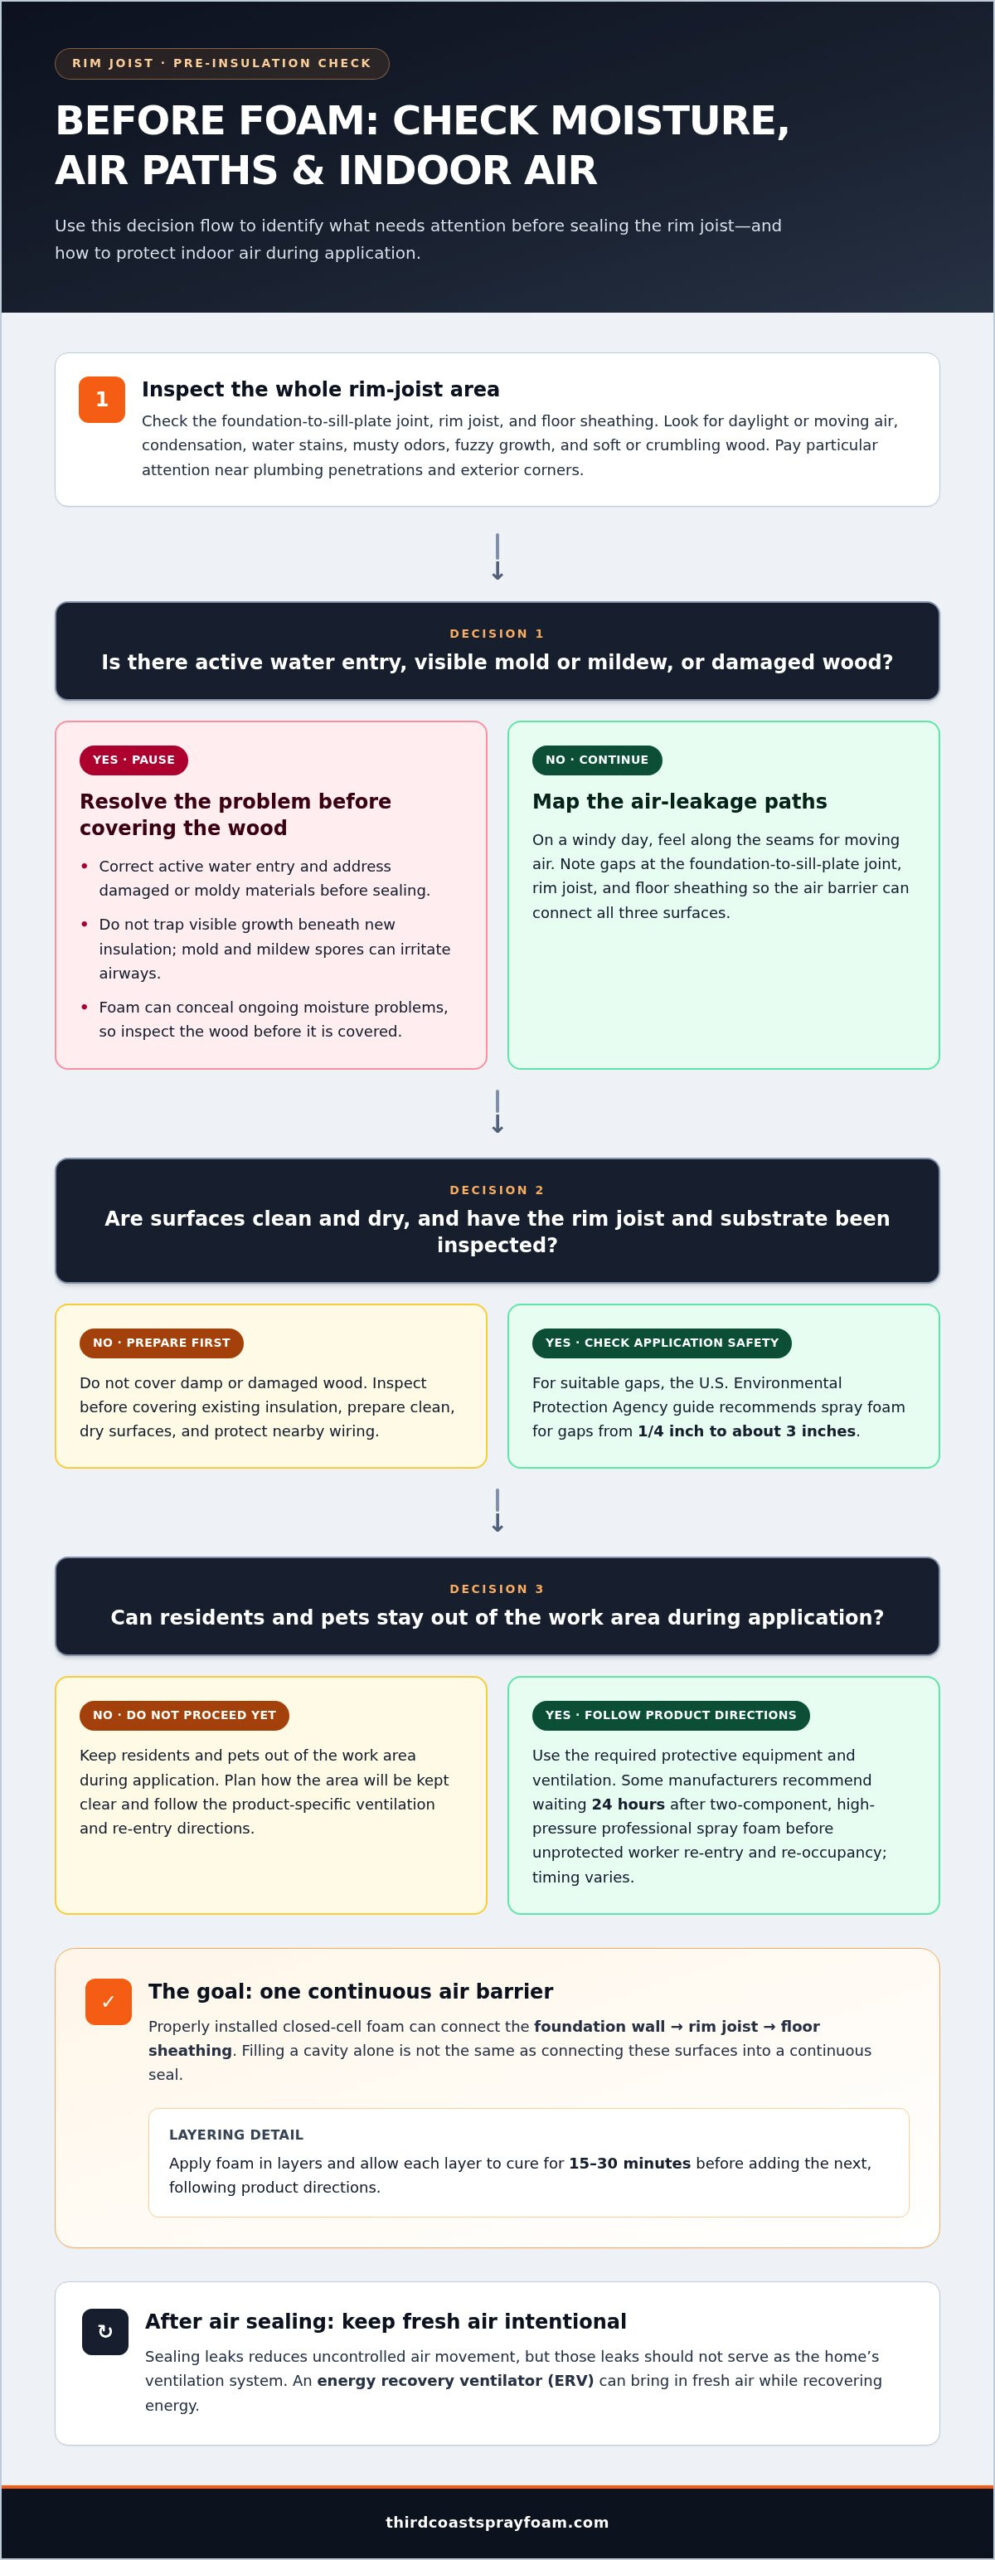
Spray foam installation can affect indoor air, so protect occupants from application vapors and follow product-specific ventilation and re-entry instructions. Some manufacturers recommend 24 hours after application before unprotected worker re-entry and re-occupancy for two-component high-pressure professional spray foam, but the recommended time may vary, according to the U.S. Environmental Protection Agency.
Before insulating, inspect the rim joist for drafts, dampness, mold, and wood damage. Look for daylight or air movement at joints, water stains, musty odors, fuzzy growth, and wood that feels soft or crumbles.
- Find the leakage paths. Check the foundation-to-sill-plate joint, the rim joist, and the floor sheathing above it. On a windy day, feel for moving air along these seams; note each gap so the air barrier can connect all three surfaces.
- Trace moisture before covering the wood. Look for condensation, staining, mildew, or rot, especially near plumbing penetrations and exterior corners. Correct active water entry and address damaged or moldy materials before sealing, since foam can conceal ongoing problems.
- Plan for clean indoor air. Keep residents and pets out of the work area during application and follow the product’s ventilation and re-entry directions. Mold and mildew can release spores that irritate airways, so don’t trap visible growth beneath new insulation.
- Keep fresh air intentional. Sealing rim joist leaks reduces uncontrolled air movement, but those leaks shouldn’t serve as a ventilation system. An energy recovery ventilator (ERV) can bring in fresh air while recovering energy, supporting ventilation without relying on random gaps.
Closed-cell spray foam insulation in rim joists
Choose foam based on the rim joist’s air-sealing needs, required R-value, and installation conditions. Considering each of these factors helps you compare materials and plan an effective installation.
-
Determine Foam Thickness and R-Value
Compare the target R-value with the foam’s rated performance, then size the application accordingly. Closed-cell spray foam provides up to R-7 per inch, so 1 inch can provide up to R-7, 2 inches up to R-14, and 3 inches up to R-21. Fiberglass batts provide R-3.5 per inch, while rigid foam boards provide R-4.5 to R-5 per inch. Closed-cell foam offers more R-value per inch. Open-cell foam may need added vapor and condensation control in DOE Zone 6 and higher.
-
Review Code and Fire Protection Requirements
Check the applicable building requirements before leaving foam exposed. The International Residential Code allows exposed spray foam at rim joists without a 15-minute thermal barrier when foam thickness is less than 3-¼ inches. This allowance does not replace checking applicable local requirements or product instructions. Rebate availability depends on program rules and eligibility; review current state, utility, or local program terms before including incentives in your project budget.
-
Install Spray Foam Safely
Prepare clean, dry surfaces, protect nearby wiring, and avoid covering existing insulation until the rim joist and substrate have been inspected. The U.S. Environmental Protection Agency guide recommends spray foam for filling gaps from 1/4 inch to about 3 inches. Apply foam in layers and allow each layer to cure for 15-30 minutes before adding the next. Follow product directions for ventilation, protective equipment, and re-entry. For project planning, review rim joist insulation options suited to the assembly.
What thickness of spray foam is recommended for rim joists?
Set the foam thickness by matching its labeled R-value per inch to the target for your climate zone. One depth does not suit every rim joist.
- Identify your climate-zone target. The guide lists R-13 for U.S. Climate Zones 1-2, R-15 for Zones 3-4, R-19 for Zones 5-7, and R-21 for Zone 8. Use the target for your location when planning the insulation depth.
- Read the foam’s R-value rating. Closed-cell foam provides up to R-7 per inch, so a product’s actual labeled performance matters. At that maximum rate, reaching R-19 would take about 2.7 inches; reaching R-13 would take about 1.9 inches. Treat these as calculations, not a substitute for the product rating.
- Account for the framing cavity. Measure the available depth at several joist bays because framing and penetrations can vary. Compare that space with the calculated thickness and avoid assuming one measurement represents the entire rim.
- Check the full assembly. Existing insulation and the rim joist’s condition affect how the final layer fits. Don’t cover damp or damaged wood; trapped moisture can contribute to mold or decay. An air seal also depends on foam connecting the foundation, rim joist, and floor sheathing, not merely filling the cavity.
For a home in Climate Zone 6, the guide’s R-19 target offers a practical starting point. Match the specified foam depth to its labeled R-value and the available framing space.
Third Coast Spray Foam: Closed Cell Spray Foam Insulation
Third Coast Spray Foam installs closed-cell spray foam for rim joists in homes with drafts, cold floors, or gaps where the foundation meets the framing. This service is a practical option when you want rim joists insulated as part of a continuous air-sealing approach, particularly after checking for moisture or wood damage. Addressing air leaks can help limit uncontrolled air movement and reduce conditions that contribute to condensation and mold. Since the rim joist connects several parts of the home’s structure, installation should account for the foundation, framing, and floor sheathing together.
For homes with different insulation needs, Third Coast Spray Foam also installs open-cell spray foam and insulates pole barns. The right approach depends on the space and your performance goals, not just the material.
Contact Third Coast Spray Foam to discuss rim joist insulation, or visit thirdcoastsprayfoam.com.
Plan the Next Improvement for Your Home
Before moving ahead, consider rim joist insulation as part of a wider home performance plan. Review how the rim joists connect with adjoining floors and the foundation, and whether future work could affect access. A well-planned upgrade should fit the building rather than treat one framing bay as an isolated repair. The scope can also help you prioritize comfort, energy use, and indoor air quality over time.
If you’re weighing spray foam rim joist insulation, bring your observations about drafts, visible damage, or renovation plans into the conversation. Third Coast Spray Foam can discuss your rim joist project and help you consider an approach suited to your home. Contact Third Coast Spray Foam to talk through your next step. A considered plan can help you move forward with confidence.
Frequently Asked Questions
Do Rim Joists Need a Vapor Barrier?
Not automatically. The right vapor-control approach depends on the assembly, climate, and how materials can dry. Closed-cell foam is moisture-resistant, but that alone doesn’t determine whether an additional vapor-control layer belongs at the floor edge. For a Michigan home, consider the foundation, rim framing, existing layers, and moisture source together before covering the wood.
What Are Rim Joists and Why Insulating Them Is Crucial?
Rim joists are perimeter framing that closes the ends of floor joists where a floor meets exterior walls. This narrow band joins several framing elements and often borders a basement or crawlspace. Include it in whole-home planning in Grand Rapids, particularly during basement renovations or when updating insulation near the floor perimeter.
What is spray foam rim joist insulation and how does it work?
Spray foam rim joist insulation is foam applied to perimeter framing, where it expands and adheres to the surface to reduce heat flow and air leakage. Inspect each bay, including corners and irregular framing, rather than assuming they’re all alike. This helps identify missed areas and supports a more complete installation in homes around Holland or Muskegon.
How much does professional rim joist spray foam insulation cost?
Professional spray foam rim joist insulation typically ranges from $300 to $700 depending on the linear footage, accessibility, and whether open-cell or closed-cell foam is used. Third Coast Spray Foam provides customized estimates based on the specific layout and condition of your basement or crawlspace perimeter.
Disclaimer
Information provided is for general educational purposes. Individual needs and circumstances vary. Speak to an experienced professional to get the correct information for your situation.