
Insulating exposed basement ceilings can make the floor above feel warmer, even as the basement itself gets cooler. An unheated basement is typically 5-8 degrees cooler than the living space, so the right insulation approach depends on whether you want to warm the rooms above or keep the basement comfortable too.
When cold floors are a daily frustration, start by looking at the exposed joists overhead. This guide covers measuring and fitting insulation between joists, avoiding compression, and protecting pipes and ducts in a colder basement. It also explains when basement wall insulation may be a better fit and why leaks or dampness need attention first. Managing moisture helps protect the building and supports healthy indoor air.
Key Takeaways
- Plan around pipes, wiring, and ductwork before fitting insulation so these systems remain accessible and protected.
- Measure each joist cavity carefully and cut insulation to fit without compressing it.
- Compare ceiling and wall insulation based on whether you want to separate the basement from the rooms above or keep the basement within the home’s conditioned space.
- For hard-to-seal ceiling areas, learn how closed-cell spray foam insulation can support a more continuous thermal boundary.
Will Insulating a Basement Make the House Warmer?
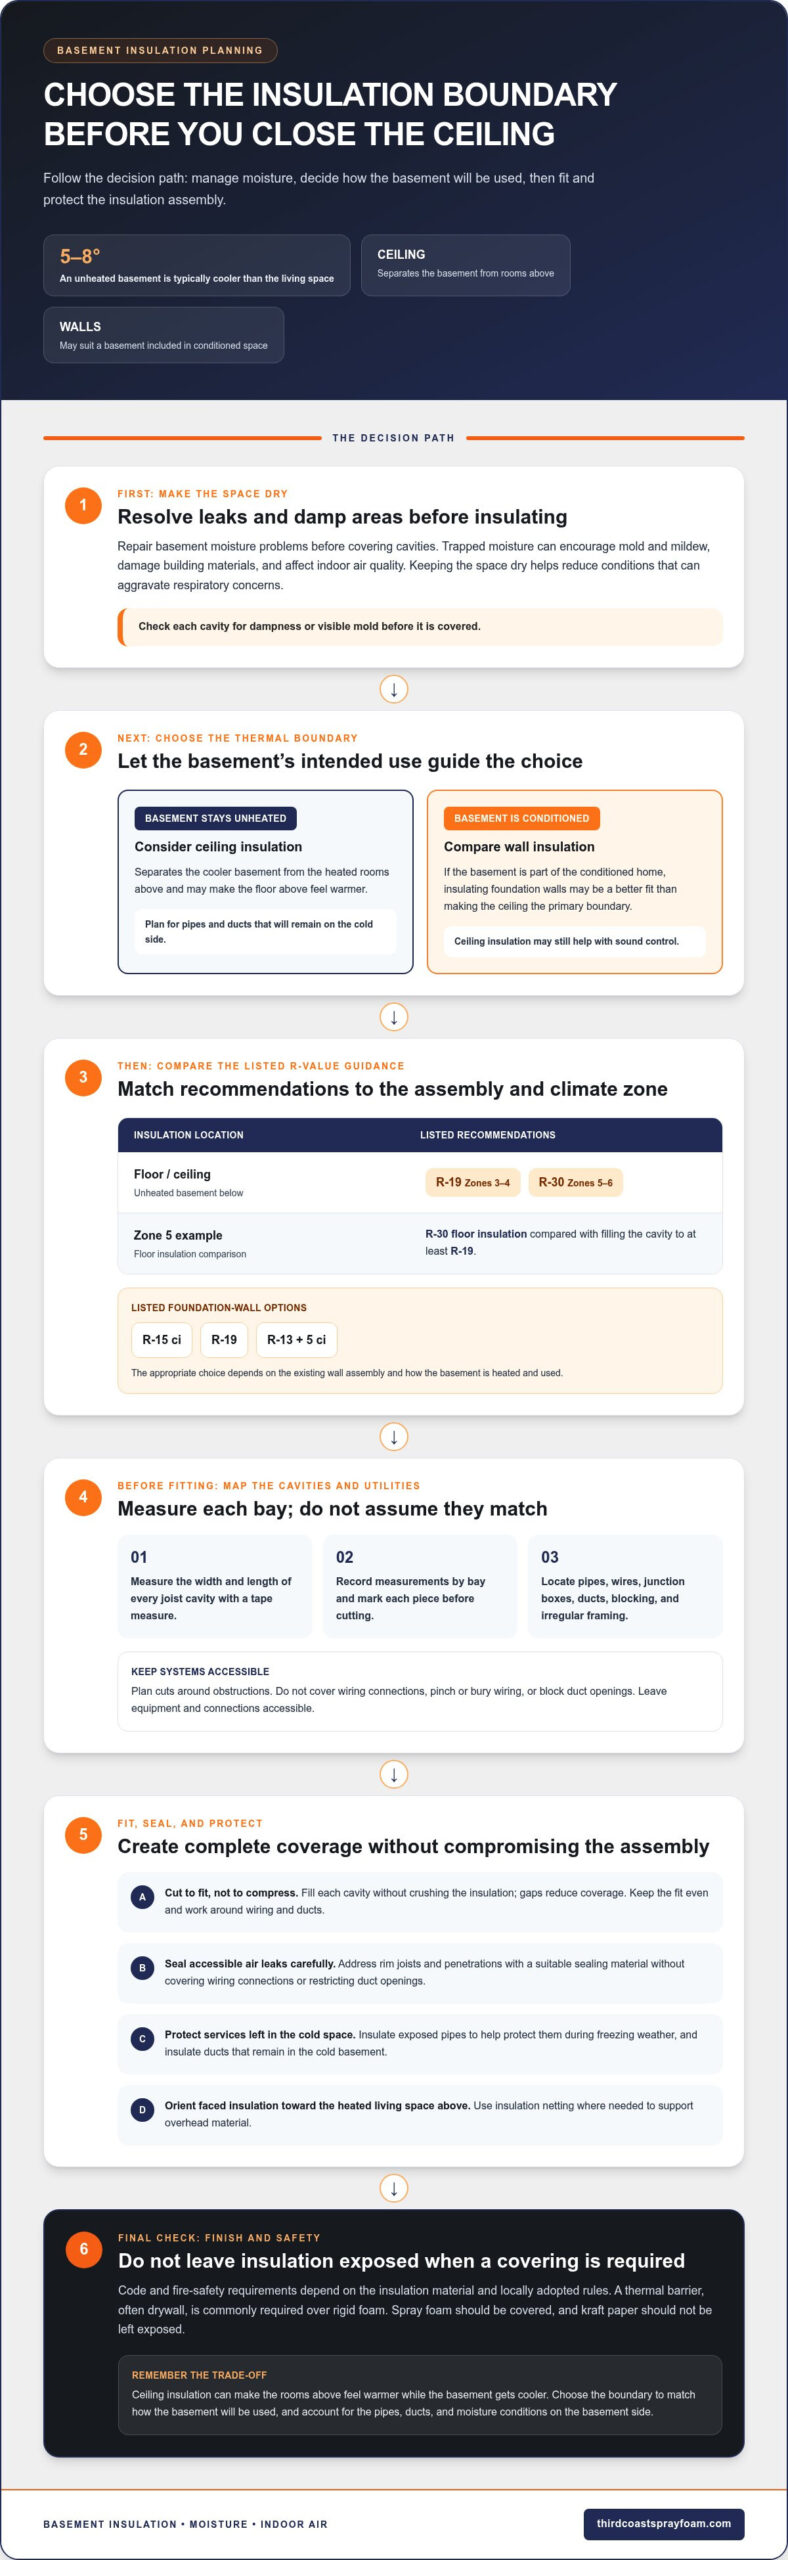
Yes. Insulating the basement ceiling can make the floor above feel warmer, while leaving the basement cooler. An unheated basement is typically 5-8 degrees cooler than the living space. Before insulating, consider how a colder basement could affect exposed pipes, ducts, and nearby wiring.
Code and fire-safety requirements depend on the insulation material and locally adopted rules. A thermal barrier, often drywall, is commonly required over rigid foam for fire safety. Don’t assume insulation can remain uncovered: spray foam should be covered, and kraft paper shouldn’t be left exposed.
Watch this ceiling-insulation demonstration before planning the work:
- Address moisture first. Repair basement leaks and damp areas before adding insulation. Trapped moisture can encourage mold and mildew, affecting building materials and indoor air quality. Keep the space dry to reduce conditions that can aggravate respiratory concerns.
- Map the utilities. Identify each pipe, wire, junction box, and duct before measuring joist bays. Leave equipment and connections accessible. Plan insulation cuts around obstructions rather than pressing material over them or blocking access.
- Seal gaps carefully. Close accessible air leaks around rim joists and penetrations with a suitable sealing material. Avoid covering wiring connections or restricting duct openings. Air sealing helps limit drafts between the basement and the heated rooms above.
- Protect cold-side pipes and ducts. Insulating the ceiling may leave plumbing and ductwork in a colder basement. Insulate exposed pipes to help protect them during freezing weather, and insulate ducts that remain in the cold space.
- Choose the right boundary. If the basement will become cooler, include its pipes and ducts in the plan. If it should stay comfortable, compare ceiling insulation with insulating the basement walls before closing the joist cavities.
Measuring, cutting, and fitting insulation between joists
Fit insulation between the joists when you want to separate the basement from the rooms above. Measure each cavity and cut the material to fit, helping prevent gaps that can reduce coverage.
Should insulation go between joists or below them? Between-joist insulation sits within the floor cavities. Installing insulation below the joists creates a continuous layer beneath them. The right approach depends on the assembly and planned finish.
-
Measure the Joist Spaces
Measure the width and length of each joist cavity separately with a tape measure. Don’t assume every space is the same: pipes, wiring, blocking, and irregular framing can affect dimensions. Record measurements by bay, then mark each piece before cutting. Check for dampness or visible mold before covering a cavity, since trapped moisture can damage materials and affect indoor air quality.
-
Fit Insulation Between Joists
Cut each batt to fill its cavity without compressing it. Crushed insulation can lose effectiveness, while gaps around the edges leave incomplete coverage. Work around wiring and ducts without pinching, burying, or blocking them. If you use faced insulation, orient its vapor barrier toward the heated living space above. Where needed, support overhead material with insulation netting and keep the fit even across each bay.
For a quieter floor, mineral wool batts can dampen sound moving between levels, though insulation alone doesn’t make a floor fully soundproof. Fit the material carefully around joists and services rather than forcing it into tight spots. If perimeter gaps need attention, rim joist insulation can address that part of the basement boundary.
Basement ceiling versus wall insulation
Insulating exposed basement ceilings makes sense when the basement will remain unconditioned and you want to separate it from the heated rooms above. If you plan to condition the basement, compare wall insulation before choosing the ceiling as the primary thermal boundary.
- Decide how the basement will be used. For an unheated basement, ceiling insulation separates the cooler space from the living area. Climate zone guides the target: listed recommendations give R-19 for zones 3-4 and R-30 for zones 5-6. In a zone 5 example, guidance compares R-30 floor insulation with filling the cavity to at least R-19.
- Compare the foundation-wall approach. If the basement is part of the conditioned home, insulating its walls can help retain their overall R-value. Listed wall options include R-15 ci, R-19, or R-13 plus 5 ci. The choice depends on the existing wall assembly and how the basement is heated and used.
- Match insulation to the assembly. For a conditioned basement, ceiling insulation may be less important than insulating the basement walls, depending on how the space is used. Check the cavity depth and existing layers so added material fits without compression. Insulating exposed basement ceilings may be less useful for comfort if the basement is already heated; ceiling insulation can still help with sound control.
- Choose a practical next step. Repair leaks and dampness before closing cavities. Keeping moisture and mold in check supports healthier indoor air and helps limit potential respiratory irritants. If wall insulation better suits your plans, consider spray foam insulation options for the project. Otherwise, plan the ceiling assembly around the basement’s intended use.
Third Coast Spray Foam: Closed Cell Spray Foam Insulation
Third Coast Spray Foam installs closed-cell spray foam for projects that need a professionally planned approach to hard-to-reach areas. Spray foam can create an effective air seal in challenging spaces, making it worth considering when ceiling cavities have irregular framing or difficult gaps.
Choose the insulation boundary to suit how you’ll use the basement. If it will remain unconditioned, ceiling insulation may help separate it from the heated rooms above. If you plan to include the basement in the home’s conditioned space, wall insulation may better suit the project. Address dampness before insulating: moisture can contribute to mold and mildew and affect indoor air quality.
Talk with Third Coast Spray Foam about your basement layout and insulation goals. Request a free, no-obligation evaluation and quote to discuss whether closed-cell spray foam fits your project.
Plan the Next Step for a More Comfortable Basement
Before insulating exposed basement ceilings, decide how you want the basement to function over time. A storage area, workshop, and finished living space may each call for a different insulation boundary. Include moisture management in the plan: resolving dampness helps protect materials and support healthy indoor air.
For joists with irregular spaces or hard-to-reach gaps, a tailored insulation plan can address the details without treating the ceiling as an isolated surface. Consider how the basement connects to the rooms above, the foundation walls, and the home’s overall comfort. This whole-space view can help you choose a suitable next step.
Talk with Third Coast Spray Foam about your basement insulation goals and the approach that suits your home. A thoughtful plan can help you move forward with greater confidence.
Frequently Asked Questions
What Else Can I Do to Keep My Home and Basement Warmer?
Reduce drafts at basement windows and exterior doors with properly fitted weatherstripping and sealed gaps. On sunny winter days, leave window coverings open, then close them after dark to limit heat loss through the glass. Check that furniture or stored boxes aren’t blocking heating registers in living areas. If the basement feels damp, address the source of moisture instead of covering affected surfaces.
What kind of insulation for a basement ceiling?
Choose insulation that fits the joist cavity and the basement’s intended use. Fiberglass batts are a common option for ceiling cavities; rigid foam and spray foam may suit assemblies that need a more continuous layer or an air seal. Before choosing material, compare product instructions, cavity depth, nearby utilities, and the planned ceiling finish.
What insulation types are best for an exposed basement ceiling?
The right insulation depends on the job. Mineral wool can help dampen sound between floors, while spray foam can create an air seal in challenging spaces. Third Coast Spray Foam installs closed-cell spray foam. Consider sound, air leakage, utility access, and the planned finish before deciding: no single material suits every basement ceiling.
How do you install insulation in an exposed basement ceiling step by step?
First, clear stored items and arrange safe access to the ceiling. Check the framing and existing materials, then plan around fixtures and utility access. Cut insulation to fit each cavity without forcing it into place, and use appropriate netting for support where needed. Before adding a finish, inspect for missed gaps and make sure service points remain accessible.
Do basement ceilings need a vapor barrier or air sealing?
Air sealing helps reduce drafts through gaps around the floor assembly. Vapor control depends on the assembly and climate: in cold climates, a vapor barrier on the warm side can help limit condensation within insulation. Don’t add layers without considering existing materials, since two low-permeance layers can restrict drying. Keep the basement dry to help prevent mold and mildew.
Disclaimer
Information provided is for general educational purposes. Individual needs and circumstances vary. Speak to an experienced professional to get the correct information for your situation.